Using ReShade with Other Graphics Injection Tools
Graphics injection tools, such as ENB and SpecialK, allow users to make significant modifications to a game’s visuals, enhancing and customizing the visual experience. These tools typically involve injecting .dll files into the game, which can sometimes conflict with each other if not set up correctly. This guide will walk you through the process of installing and using ReShade alongside other graphics injection tools like ENB and SpecialK, ensuring smooth integration and optimal performance.
ENBSeries
Installing ENB alongside ReShade:
ENBSeries, developed by Boris Vorontsov, is a powerful tool for overhauling game visuals. It provides extensive customization options, allowing users to tweak various parameters to achieve their desired visual style. While ENBSeries offers a wide range of features, it must be configured correctly when used with ReShade to prevent conflicts.
ENBSeries is often used in conjunction with ReShade to further enhance game visuals. However, unlike ReShade, ENBSeries is game-specific, requiring a unique version for each supported game. This specificity allows ENBSeries to access game resources tailored to that particular game, such as time-of-day settings, texture information, and more.
Installing via ENBProxy
-
Download ENBSeries: Visit the ENBSeries website and download the version specific to your game. Consider searching for pre-made ENB presets, as the default download includes only a few example shaders.
-
Extract Files: Unzip the downloaded file and extract its contents into your game’s root folder. If you’re unsure where the root folder is located, refer to this guide.
-
Rename ReShade DLL: Rename the ReShade
.dllfile (typically nameddxgi.dllord3d11.dll) toreshade.dll. -
Edit enbseries.ini: Open the
enbseries.inifile and modify the following lines:EnableProxyLibrary=true InitProxyFunctions=false ProxyLibrary=reshade.dll
Ensure you follow the exact capitalization as shown. Incorrect capitalization may prevent ENB or ReShade from loading properly.
Installing via Ultimate ASI Loader
For older DirectX 9 games, additional tools may be required to ensure compatibility. One such tool is the Ultimate ASI Loader.
-
Download Ultimate ASI Loader: Get the latest version of ASI Loader.
-
Extract Files: Unzip the downloaded file and extract its contents into your game’s root folder. If needed, refer to our guide on finding your game’s root folder.
-
Resolve File Name Conflicts: If there are conflicting file names, use one of the alternative ASI Loader file names listed below:
- d3d8.dll
- d3d9.dll
- d3d11.dll
- ddraw.dll
- dinput.dll
- dinput8.dll
- dsound.dll
- msacm32.dll
- msvfw32.dll
- version.dll
- vobisFile.dll
- wininet.dll
- winmm.dll
- xlive.dll
-
Create Plugins Folder: In your game’s root folder, create a new folder named
plugins. - Move ReShade Files: Move the following ReShade files into the
pluginsfolder:reshade-shadersReShade.iniReshadePreset.inid3d9.dll,d3d10.dll,d3d11.dll,d3d12.dll, ordxgi.dll(depending on your game’s DirectX version)
-
Change ReShade DLL Extension: Change the extension of the ReShade DLL file to
.asi. - Install ENBSeries: Download and extract the ENBSeries files into the game’s root folder.
With ReShade now loaded from the plugins folder, any new shaders or textures should be placed in GAME_FOLDER/plugins/reshade-shaders/. ReShade Addons should be placed in GAME_FOLDER/plugins/.
SpecialK
SpecialK, developed by Kaldaien, is a versatile tool designed to enhance game performance and provide additional features for PC games. It offers capabilities such as fine-tuning HDR settings, improving frame pacing, and supporting custom textures. SpecialK can significantly optimize your gaming experience, but when used alongside ReShade, proper setup is crucial to avoid potential conflicts.
Installing ReShade alongside SpecialK
-
Download and Install Special K Injection Frontend (SKIF): Begin by downloading SKIF, which is the front-end for injecting SpecialK into your games.
-
Launch SKIF: The installer will place a shortcut on your desktop. Launch SKIF, and it will automatically scan and list all the games installed on your PC.
-
Install ReShade: Follow the standard procedure for installing ReShade into your game. Ensure that ReShade is correctly installed before proceeding.
-
Launch the Game through SKIF: In the SKIF interface, double-click on the game you want to run. This will start the game with both SpecialK and ReShade active.
-
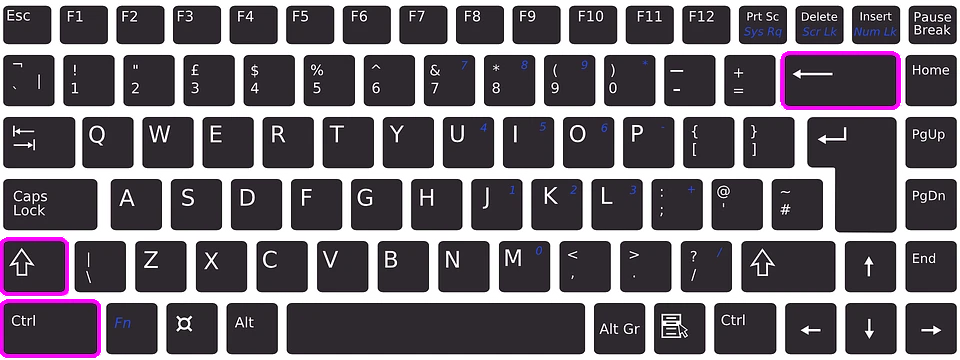
Access the SpecialK GUI: Once the game is running, you can access the SpecialK configuration menu by pressing Ctrl + Shift + Backspace together at the same time.
For more detailed information, refer to the official SpecialK wiki page dedicated to ReShade integration.
Do not use SpecialK in multiplayer games as it may trigger anti-cheat mechanisms, leading to potential bans.